Showing posts with label tutorial. Show all posts

Tuesday, January 4, 2011

DIY HOLIDAY GIFTS

Back from holiday hiatus! I had such a blast with all of my family and friends! But I’m definitely feeling the effects of having to get up at 6am again. Back to the ole routine!

**********

This year I decided to make some DIY gifts. And I’ll admit, they didn’t turn out exactly to my standards of perfection, but I liked them anyway.

I had to post this after the holidays because the two friends I made these for are readers, so I didn’t want to ruin any surprises!But if you’re inspired to follow the same gift idea, these are simple and would work for any gift idea.

All you need is a tote bag, iron transfer paper, an iron and a unique design:

xmas gifts (3)

I purchased the canvas bags and transfer paper from cheaptotes. And as the name implies, the items are really affordable and decent quality. The items also shipped really fast which was great.

I made three of these bags (one for myself, of course!), but I’ll show you the process for my ingenious Lady Gaga lyric design.

Start by printing your design (on regular paper, don’t waste the transfer paper) and making sure that it fits and is arranged the way you want it. It’s also important that you flip your design so that it transfers correctly.

xmas gifts (2)

Then heat up your iron to it’s highest setting but DO NOT use steam. Iron your tote bag so it’s nice and wrinkle-free.

xmas gifts

You have to love old apartments, I have a built-in ironing board in my kitchen. I suppose it’s so I’m able to cook a full meal for my family and get the ironing done at the same time.

Anyway, then you’re ready to iron on your pieces. For a full sheet, you can just arrange it and iron across the entire length of the paper for 3-4 minutes. Although in hindsight, I wish I would have cut around the design more because you 1) have more paper to use later and 2) you won’t get that transfer excess on the tote bag which is sort of noticeable.

Since these pieces are cut up, I decided to iron them one piece at a time keeping the previous pieces down until I was ready to remove them all at once.

xmas gifts (1)

After you’ve ironed over each piece and applied a small amount of pressure with the iron, you should be ready to take the paper by one corner and removing it slowly. I was worried I would have a lot of trouble with this part, but it was relatively easy. If it started to tear, just move to another corner. If you find that you left some paper that’s not ironed down, take the tip of your iron and smooth it down. Very simple!

Then, you have your finished products! The Farmer’s Market tote is for my (I blurred out my last name in the picture for at least some internet anonymity).

xmas gift 4

I think my girls liked them! I meant to take pictures of the awesome gifts they got me, I’ll have to post those later!

Saturday, October 16, 2010

Homemade Halloween!

I can barely put into words how excited I am about my Halloween costume! Hence why I'm posting on a Saturday!

I decided this year to go after the ultimate fashion no-no icon:
A completely ridiculous idea but I knew the whole outfit hinged on finding cheap, white feather boas. Once those had been found (4 to be exact), it was a matter of being patient and stalking salvation army. Fortunately today was my lucky day!

Here was my cast of characters:

IMG_0350.jpg


Feather boas, a child's black t-shirt, an orange onesie (it was thicker than a t-shirt and I liked the color), a large men's white t-shirt and the piece de resistance: a child's Christening gown.

In the spirit of New Dress A Day, I couldn't help but put it on before snipping away at it

IMG_0351.jpg


The muslin in at the bottom needed a little love to get right, but it was the puffiness of this dress that made it perfect!

I started with cutting off the...um, fringe near the neckline. I'm definitely keeping it for when I feel like dressing like a schoolmarm

IMG_0352.jpg


From there I don't have a lot more photos because I was in full-on crazy crafting mode. But once the neck on the dress was cut off, I worked on the swan neck.

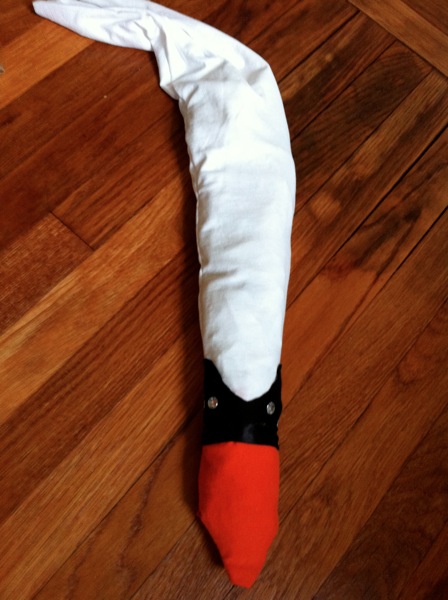
I cut up the white t-shirt into two long strips and sewed them together leaving both the top and bottom unstitched. Then I cut up the orange onesie (which made me feel kind of bad) into two sides to make up the beak and sewed those two pieces together leaving the one side open so that I could then sew it onto the white tube. Once I sewed together the white "neck" and orange "beak", there was visible stitching when I turned it inside out, so I covered this with black ribbon. I hot glue gunned the ribbon and black t-shirt to make the eye. After all of this, this is what I had:

IMG_0353.jpg


I also glued some jewels on for the eyes that I found in my craft box. I stuffed the swan with the extra t-shirt & onesie fabric - reuse and recycle!

Then it was just a matter of securing the feather boas to the lacy part of the dress. I found that fishing wire worked perfectly -- it was so easy to knot it into a small part of the lace and just wrap it around the boa so that it held it in place. It took me 3 boas to wrap it around the front of my dress (I left the back plain) and 3 hours later...TA DA:

IMG_1163.jpg


I left the lace sleeves on because I think it looks kind of cute and it will be warmer in the New England weather. Believe it or not the feathers keep me pretty warm, so I think it will be great for walking around outside.

*****

IMG_1169.jpg

Happy High Fashion Halloween, ya'll!!

Thursday, October 14, 2010

Dressing up the Dresser

As I mentioned in THIS post, two weekends ago I was inspired to do a craft project. I had been collecting the materials and waiting on the perfect paper and luckily I found some at Paper Source.

Someone had given me this dresser and although it’s in really good condition, it was decidedly too plain for my liking.

Dresser1

It’s the first thing you see when you look into my bedroom, so I thought I’d give it a little more life. Here is my cast of characters:

Dresser2

I started with the screw driver to take off all of the dresser pulls and once these were off, I made sure to dust off and clean the dresser before I did anything else.

Then I measured the area of each drawer that I wanted to apply the paper to and cut out this length on the paper. In my case, the longer drawers required me to match up the pattern and extend the paper because it wasn’t long enough. I worried that it wouldn’t look right, but you really don’t notice it.

I applied mod podge (which has the texture of Elmer's glue) with a paint brush to the wooden drawer area, laid the paper on top, smoothed it over with the credit card (select a card you don’t ever plan on using!) and then just let it dry. Some tutorials I read online suggested applying mod podge on top of the paper once it’s been applied, but I kind of felt like this was unnecessary, except around the seam area.

After some meticulous measurements, cutting and painting with glue I had this:

Dresser3

I opted to keep the brass handles because I thought they tied the design and wood together. I’ve contemplated spray painting them but it seems like the paint would just wear off since I actually use this dresser.

I did however, want to replace the top pulls with knobs, so with a little searching I found these turquoise cuties at Hobby Lobby (which we don’t have around here so my mom picked them up)

Dresser5

Turquoise and damask! Perfection!

Dresser4

My finished product! I’m so pleased with how this turned out and if I move and decide I want more of a statement pattern, its easy to tear this off and replace with new (or so I’ve been told).

This also started a paper frenzy in me! And with great inspiration pieces like:

via living la vida rita

The oh so plain but necessary ANEBODA ikea wardrobe in my bedroom (the image above is in the ANEBODA family) needs something fabulous like this.

and of course my filing cabinet that’s currently sitting in my living room could use this:

via design*sponge

I found this gorgeous wrapping paper this weekend that I plan on applying to the third dresser in my bedroom (old apartments have NO closet space, so yes, I have two dressers and a wardrobe in my bedroom). Hopefully I’ll get to that soon…

Tuesday, September 14, 2010

Back to craftin’

Even though I’m up to my neck in graduate school items, I still want, and at this point, need a creative outlet. Sure I should be working on my study guide but fall is here and I want to celebrate it with some apartment decor.

When I first started exploring the arts and crafts of Blogland, I found THIS book wreath tutorial at Living with Lindsay. My favorite DIYs are the ones that find professional crafts that are super pricey and copy it for 2% of the cost, and that’s exactly what this woman did.

The supplies are simple enough:

photo (5)

Styrofoam wreath, hot glue gun, and a trashy, well-aged novel. This book has more life hanging on my door than it would have unread on my shelf.

I started by covering the Styrofoam in a layer of the book. This ensured that if I missed any places that you wouldn’t notice any startling white spots.

photo (4)

I also found that the best technique to apply the pages to the wreath was to fold it up (as you can see above and by fold I don’t mean press it down, let it be fluid) so that the bottom part of the page where you will be applying the glue is visibly layered. I then (actually) folded a small section at the bottom so that the entire bottom page’s layers were showing and applied glue to all of the layers. I found this handy as it made sure the pages stayed in place instead of parts of the pages being unglued.

Two long telephone conversations later (I love to multitask) and I had my finished product

photo (2)

It’s not perfect, but it is fun and great for a book lover in the fall. Also each wreath depending on your fold will come out differently. Honestly, this was so easy and very rewarding. Also the entire thing cost me $3 glue gun + $1 book + $1 wreath =$5!

I can’t wait to do more fun crafts in the future.

Back Camera

Monday, July 19, 2010

Classing up the place

I hope everyone had a nice weekend. I was very happy because my parents drove across to come visit me for a few days! We played it pretty cool, staying local except the gigantic antique market in Brimfield, MA. My parents LOVE flea markets and while this place was very cool to walk around in, it was a little too rich for our blood. The funny thing is, none of us purchased anything here although we spent 4 hours walking around the place, but on the way home we saw a roadside junk shop and we all purchased a ton of stuff! I love my family that way.

Now, onto the real reason for the post – and the actual reason for starting this blog in the first place – I did a cool little project for my apartment. I was walking around Kohls when I saw these cute little damask wall decals. Normally, I don’t like Kohls but you really can’t beat the fact that half the store is normally up to 40% off. So for only $10 I did this little project:

photo(5) I began by cutting out each individual design from the roll

photo6 This extra step helps to layout the pattern before you start sticking things everywhere.

photo(3) So once you’ve found a layout that you like, you can start to cut and stick. I decided to be a little more creative with this design by cutting some of the designs and placing them only from the drawers. This step is pretty easy as the designs are really easy to cut, just make sure to make straight cuts.

I even went so far as to cut a hole in one of the designs and place it around one of the knobs. This also was pretty easy and the designs are very forgiving in that they won’t show any blank spaces if you’re careful.

So now the drawer in my hallway that holds all my towels and misc items looks much more interesting!

photo(4)

I even had enough left over that I put some inside the door of my bar. The frosted glass gave it a cool, understated look.

photo

A super easy project for around $10!

Tuesday, July 13, 2010

Bad Ass Embroidery

For my latest project, I had two sources of inspiration that I decided to combine into one kickass project. The first one was THIS neat DIY from Design*Sponge. But I decided to expand on it because I don’t have a color printer and the idea of actually stitching something like this sounded fun. Then I saw THESE prints from Paper Jam Press and the ideas just merged.

So for my first embroidery, I give you:

Back Camera

I just love the mix of homemaker and gangster. It's just my style!

I used the downloaded the needlepoint font from HERE, which I realize is a little redundant since I’m actually using needlepoint, but I really liked the style of it. Then I just purchased the fabric (I used a thick, embroidery fabric for this first project. I’ll probably just purchase regular fabric from now on but it did help to guide my stitches), some thread (like the kind you used to make friendship bracelets out of), a wooden hoop and needle and went to town!

Also, I realize I’m using embroidery and needlepoint interchangeably, which is probably incorrect and I apologize to anyone whom this might be bothering.

I’m rather happy with it for my first attempt. It’s a bit off-center and the fabric needs ironed so badly, but I like it. I’m hoping it will become one of a series so that I can hang all of them on my wall.

Back Camera

If anyone has some great rap lyrics, I’d love some suggestions! I’m thinking “Damn it feels good to be a gangster” is next and possibly making one for my brother as a housewarming gift that says, “Bitches ain’t sh*t”.

Tuesday, May 25, 2010

Beauty lies in the details

The minute that I brought home my beautiful craigslist find, I knew I had to add to it just a little bit - give it that sense of uniquely mine and all. The easiest and nicest thing to do was to add some color to the bottom of these drawers. My initial props have to go out to THIS POST for the inspiration.

I was looking for wallpaper or scrapbook paper to line the drawers with when I went into the hardware store – just to see if they had any pre-fabricated shelf lining that I loved even more (which I didn’t expect to be the case). I was just about to walk out when the sales guy told me to come over and look at what they were about to throw out. He had 4 HUGE books of fabric swatches that they were going to toss because they were discontinued and he wanted to know if I’d want to cut out the fabrics I liked before they did it. Needless to say, I praise this hardware store and gentleman now because it was perfect for what I wanted to do!

So my combination of fabric swatches:

Picture 181

And my empty drawers + a roll of scotch tape:

Picture 180Lead me to this!!

Picture 188 Isn’t it darling! All I did was roll some scotch tape like you do to hang posters and tape the fabric down to the wood. You can use double sided tape or something a little stronger if you want, especially if you're going to be taking items in and out all of the time, but for me this is the perfect and seasonally temporary solution! The bottom drawers didn’t even require any cutting!

Picture 185

And on the top drawers I got a little more creative with my felt fabric:

Picture 183 I’m so pleased with it and it cost me a total of $0.00! Plus I have tons of leftover fabric swatches that I can use later, like this little gem:

Picture 192

Horrah for simple touches!